With WP Engine’s proprietary LargeFS system, utilizing an Amazon S3 bucket, you can offload all of your site’s images to help stay within your plan’s local storage limits. However, this does present a challenge when you want to create a new install as a copy of an install using LargeFS. The images are not copied over since they reside in your S3 bucket. This guide will help ensure that all of your files get copied over to your new install with no issues.
STEP ONE: INSTALL AWS CLI
Amazon Web Services offers a local Command Line Interface (CLI) that you can install on your computer to help assist with this process.
Instructions on how to install this program can be found here.
STEP TWO: OBTAIN ACCESS KEY AND SECRET KEY
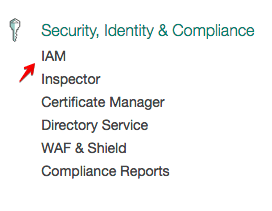
Once installed, you will need to get your AWS Access key and Secret key. In the AWS Console, Head over to Services and then the IAM policies page.

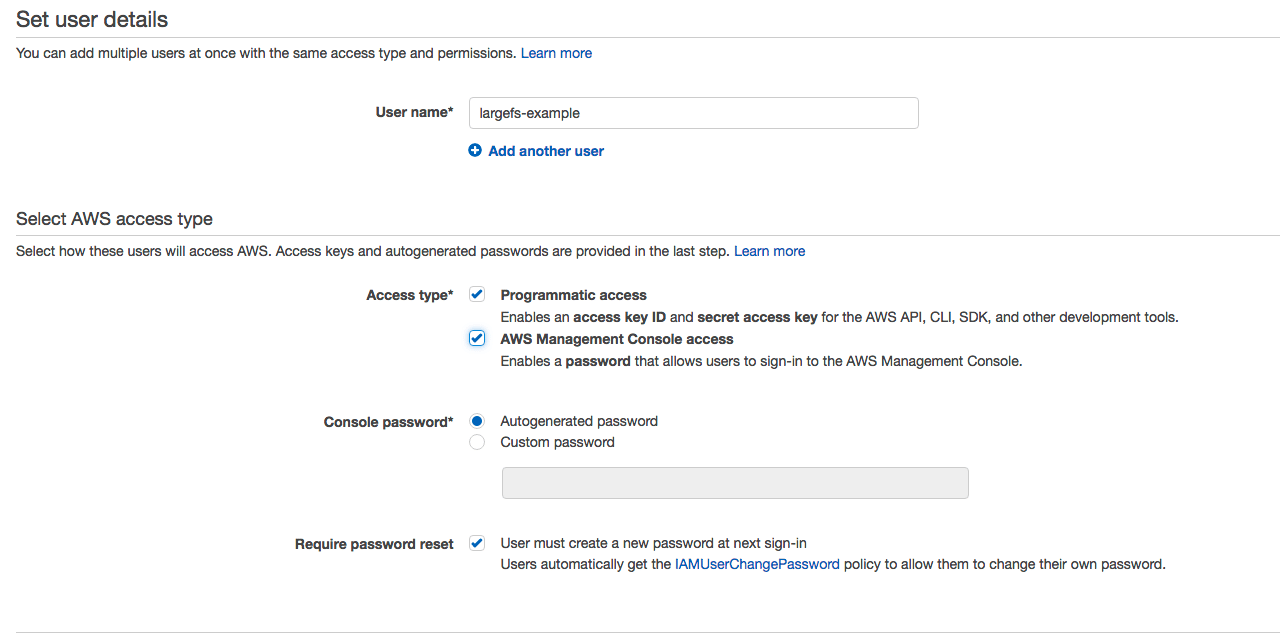
Once you’re on the IAM page, click Users on the left hand navigation menu and then click the blue “Add User” button. You can name this user whatever you wish. Next, check the Programmatic access box to enable access and secret keys, as well as the AWS Management Console access. Once that’s all configured, click Next.

Now you should be on the Permissions page. Click “Add Existing Policies Directly” and choose “AdministratorAccess” to grant this new user administrator access to your account. This is the user we will use to configure AWS CLI.

You’ll be taken to the review page after clicking the Next button where you can ensure everything is setup properly for your user. Now click “Create User” to be taken to the final page where you will download the necessary keys.

You are only shown these keys once, so when creating the user be sure to download them as a CSV. Copy both your Access key and Secret Access key from the console window, or from the .csv file. Then open up a local terminal.
STEP THREE: TEST CONFIGURATION WITH KEYS
If you have installed AWS CLI successfully in your local terminal, type aws configure to allow your computer to connect to your bucket using AWS CLI functionality. Fill in your Access key and Secret key and leave the last two fields blank.

Now you can test AWS CLI and ensure that you can access your bucket with the following command:
aws s3 ls s3://BUCKET-NAME/INSTALL/
Replace BUCKET-NAME and INSTALL with your bucket and WP Engine install name. You should be presented with PRE wp-content/ as the response.
STEP FOUR: CREATE NEW COPIED INSTALL
If you have not yet created your new install, be sure to do that now by going into the WP Engine User Portal and adding your new install. Instructions for this can be found here. Take note of your install name as we’re going to need this for the AWS CLI. You will want to create this as a copy install, and ensure you include the database.
STEP FIVE: SYNC FILES
Once your install is created, go back to your terminal and run the following command to sync your files from the origin install to the copied install. In this example, we are going to be using the same S3 bucket, however if you’re utilizing a separate bucket for each install this will also work.
aws s3 sync s3://BUCKET-NAME/INSTALL/ s3://BUCKET-NAME/NEW-INSTALL/ --acl public-read
This will sync all of the files from S3 folder from the origin install into the new one. Once this has completed, reach out to our Support Team your bucket name to finalize the setup by adding your bucket name to your new install. You should now be able to sign in to the WP Admin area of the new install and see the images within your Media Library.
OPTIONAL: DOWNLOAD FILES
If you need to pull files stored within your S3 bucket to your local computer for purposes of regenerating thumbnails, or compressing your images you can utilize the “sync” command again, but with one difference in syntax:
aws s3 sync s3://BUCKET-NAME/INSTALL/ ./INSTALL/
You will need to replace BUCKET-NAME and INSTALL with the respective bucket and install name for the site whose files you want to copy to your local machine. This command will create a folder called INSTALL in the current working directory of your terminal and copy everything within the install folder in your S3 bucket to your local machine.
From here you can upload your media files via SFTP to your WP Engine install, which allows you to regenerate your site’s thumbnails or compress the images. Once the images are 10 days old again they will be re-uploaded to your S3 bucket automatically.
Note: If you run into any issues regarding “403 Access Denied” messages when syncing your files, please contact Support via the User Portal for further assistance.
